DIY wifi range extender with TP-link and DD-WRT
Wifi is a very useful technique for connecting various devices in to the internet in a clean and wireless manner. They operates at 2.4/ 5GHz and hence to get a uniform coverage, there is a necessity for installing multiple wifi access points to cover all the nooks and corners of a large building. There are commercial products which are very expensive for routine home users. Many of the wifi repeaters available in the market have many limitations. Some of them works with a specific brand of routers, some of them need wired connections etc.
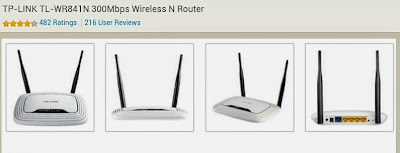 |
| A cheap WR841n router wihich supports DD-WRT and can be used as a wireless repeater for the wifi |
A simple solution to solve the limited range of wifi signal at home is by using a modified router with a special firmware called DD-WRT. This will allow using an extra router which will wirelessly connect to the primary router and then repeats those signal with a new ssid. For example i use this to extend the wifi from ground floor of the bulding to the first floor, by placing my second router with DD-WRT on the second floor which pick the signal and repeat in the upstairs. The efficiency of the system can be improved with a wired solution. If you need that , the same firm ware can support that as well.
Installing DDWRT on a TP link WR841N router
DD WRT is a firmware (or simply the operating system for a wireless router) which can add new functionality to a simple supported wifi router (
List of supported devices). These are wifi routers (some people call them as modem by mistake) and has either a Broadcom or Atheros chip inside. Replacing the original firmware with DD WRT can be done easily with a supported router. If you need to know more details on dd wrt installation, you can read more at
here. To be simple, check the model number of your router carefully and locate the firmware by going
here
For TP link WR841N, i did the following. My router was version 8, so i chose the file for
TP-Link TL-WR841N(D) 8.x
The (D) stands for detachable antenna and the same file worked fine for my TP-LinkWR841N version 8. I got my firmware files
here. (
IMPORTANT: make sure that you choose the correct firmwares, otherwise you may permanently damage the router)
Connect the router to your computer with an ethernet cable (use one of the 4 lan ports on the router and do not use the wan port which is usually of a different color socket). Open a webbroser on the computer and type http://192.168.1.1 on the browser (some routers have http://192.168.0.1) and a webpage with router settings appears. Go to the advanced menu with firmware update to change th efirmware. First use the file
factory-to-ddwrt.bin and wait for a while as it flashes. Use a ups or unintereepted powersupply as powerfailure during this process will brick the router. After fininishing this router reboots and ddwrt appears. Then again go to advanced setings and update the firmware with
tl-wr841nd-webflash.bin (or corresponding file for the router model and version) and you are done with the main part. Reboot and set a password for your router and remember this password.
Setting up the ip range on dd wrt
Use an ip adress range which is different from your primary router to avoid conflicts and smooth operation. See the figure below
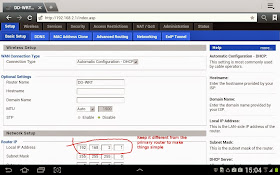 |
Setting ip range on dd wrt wifi repeater [click on the image to zoom]
|
Wirelessly Connecting to the main wifi access point as a client
Now we need to connect this router to an access point as a wifi client and the settings are shown in the figure below. The idea here is to build a wifi client - repeater bridge in a wireless fashion. Carefully insert the ssid and keep the settings as shown ie Client mode, N-only and ignore the virtual interface at this point.
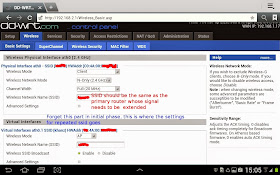 |
| Setting up dd wrt as a wifi client [click on the image to zoom] |
After this step, the router can connect to the primary access point and by connecting an ethernet cable to one of the lan ports , you can access internet from this router. Wifi keys or passwords should be enterd for protected networks and can be done easily by looking at the figure below (under wireless security)
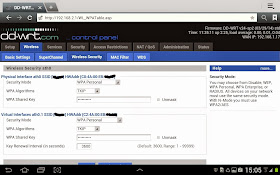 |
| Inserting the security keys for ddwrt wifi client [click on the image to zoom] |
Now we have internet on LAN ports of the router, and we need to retransmit it as a wireless access point. For this add a virtual interface under Wireless as shown below. Choose AP (access point ), enter an ssid for the repeater (it could be anything as you wish). After this , if you click on wireless security, there will be an option to setup the passwords and encryption for this virtual wireless interface. (see the previous figure)
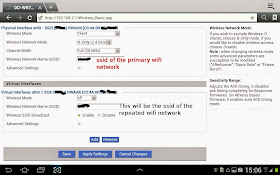 |
| Adding a virtual wireless interface to repeat the wifi [click on the image to zoom] |
This is the simplest solution to make a wifi repeater bridge using dd wrt. There are sevral possibilities and options. For simplicity , i have kept it minimal and graphical. If you face any challenges drop me a comment and will try my best to sort it out.


Thanks so much! I'm a novice and it worked. Two things tripped me up: 1) finding correct firmware -- need to go to most recent date, then search in there for model. 2) Address of router changed after flashing factory to ddwrt. bin -- first accessed router on 192.168.0.1 but after flashing said page couldn't be accessed. Finally went to 192.168.1.1 and found the dd-wrt router page to do the second bin file flash. Smooth sailing from there. Thanks again!!!
ReplyDelete